

Eurotherm 3/4" Thermostatic Cartridge Information and Maintenance


1. Remove Volume Control Handles (if Present)
Contemporary Volume Control Levers

- If your shower has the contemporary volume control handles, unscrew and remove the Volume Control Levers by turning them counterclockwise ↺.
Traditional Volume Control Levers

- If your shower has the traditional volume control handles, unscrew and remove the holding screws at the top of the levers by turning them counterclockwise ↺.

- Lift off and remove the Volume Control Levers.
2. Remove the Temperature Control Handle
Temperature Control Handle with Side Set Screw

- If your shower has a temperature control handle which is held in place with a side set screw, unscrew and loosen the set screw on the side of the handle by turning it counterclockwise ↺ with a 5/64" Allen key.
- Pull and lift off the temperature control handle.
Cross Temperature Control Handle
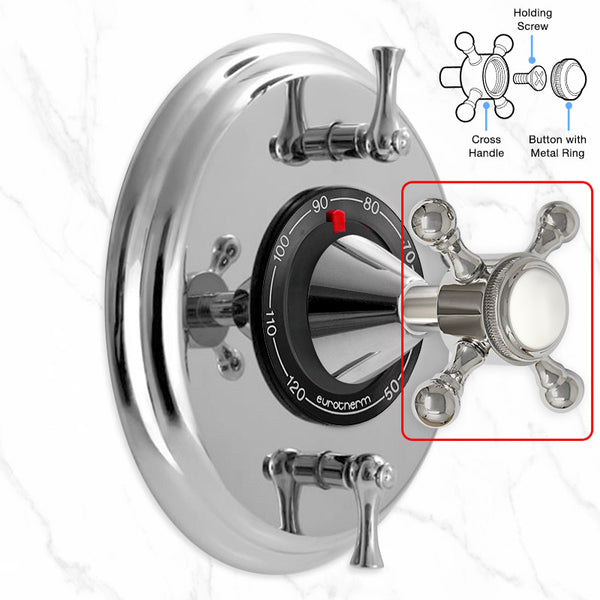
- If your shower has a cross temperature control handle, unscrew and remove the button with metal ring by turning it counterclockwise ↺.
- Remove the holding screw at the center of the handle by using a Phillips screwdriver and turning counterclockwise ↺.
- Pull and lift off the temperature control cross handle.
3. Remove the Cone Escutcheon
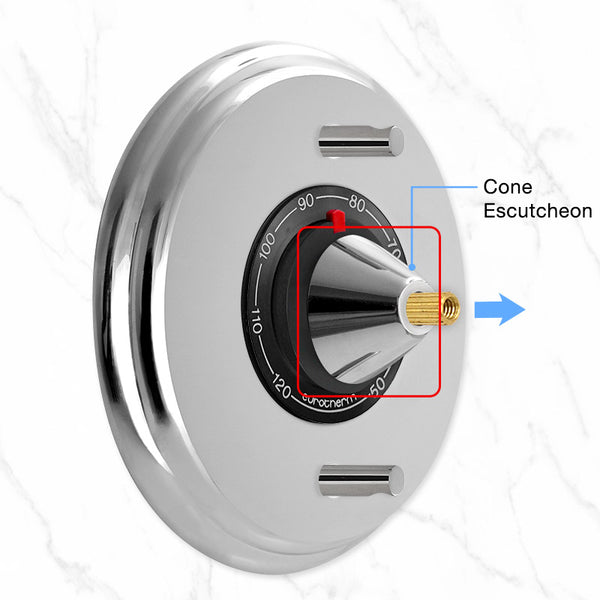
- Pull and lift off the Cone Escutcheon. (On some shower systems, turn the escutcheon counterclockwise ↺ using a bare hand to unscrew it and then lift it off.)
4. Remove the Pointer Assembly

- Using a 1/8" Allen key, unscrew and loosen the set screws on the Pointer Assembly. (Make sure not to lose them or make them fall down the drain.)
- Pull and lift off the Pointer Assembly.
- View Pointer Assemblies
5. Remove the Swivel Bushing

- Unscrew and lift off the Swivel Bushing by turning it counterclockwise ↺.
- View Swivel Bushing
6. Remove the Temperature Dial and Black Adapter

- Lift off and remove the Temperature Dial and Black Adapter.

7. Remove the Valve Cover Plate

- Lift off and remove the Valve Cover Plate.

- View our Thermostatic Valves and locate the valve that looks like the one in your shower wall, so you can shop for the right replacement parts for your thermostatic shower valve.
- If you would like us to help you identify your shower valve, take a photograph of the in-wall thermostatic valve and send it to us via text message or email.

| Fastest Response Time | The Bi-Metallic cartridge has the fastest response time: ± 1 second and 1° F when fluctuation in supply pressure occurs. |
| Integrated Check Valves | Built-in check valves prevent cross connection |
| World Class | Used in the finest homes, hotels, and yachts |
| High Flow |
|
| Solid Brass | Made from premium quality solid-brass components |
| Lifespan | 10 to 20 years, depending on water quality and other factors. Typically up to about 15 years. Regular cleaning each year will extend the life of the cartridge.More ⟩ |
| Warranty | Two years |
| Pioneering | Made by Eurotherm, a pioneer of thermostatic valves since 1947 |
| 🇫🇷 | Made in France |
Valve Instructions
Maintenance
The world-class thermostatic cartridge is imported from France and has a warranty of 2 years.
The lifespan of the thermostatic cartridge can be 10 to 20 years, depending on water quality and other factors. It typically lasts up to about 15 years.
The manufacturer recommends regular cleaning of the thermostatic cartridge each year. The frequency depends on the using conditions and the water quality (pH, limescale, water treatment, etc.).
Lack of maintenance can significantly reduce the lifespan of a thermostatic cartridge. Regular cleaning to remove sediment, scale, or debris can extend its life.
💡TIP The thermostatic cartridge should be removed and cleaned annually for optimum useful life of the system
Maintenance Checks
- To clean and descale the thermostatic cartridge, soak it in a solution of half water and half white distilled vinegar for 1 to 3 hours. Brush the filters.
- If the flow rate drops or the temperature becomes unstable, check the condition of the thermostatic cartridge.
- Clean the strainers and membrane jets of the thermostatic cartridge.
- If this is not sufficient, replace the thermostatic cartridge.
Troubleshooting
In the event of an operating problem with the thermostatic shower valve, check the following.
- Make sure hot and cold inlets are correctly connected to the marked hot and cold side of the thermostatic valve.
- If the shower valve has local shut-offs, make sure that they are fully open.
- Be sure there is sufficient water pressure; check the water pressure at the main valve in the residence.
- Check whether the screens within the thermostatic cartridge are clear of debris.
- Make sure that you have correctly calibrated the thermostatic cartridge.
| Symptom | Remedy |
|---|---|
| The water does not run with the desired temperature. |
If the thermostatic cartridge is less than 10 years old, clean and test it:
If the water temperature does not adjust properly, and especially if the thermostatic cartridge is over 10 years old, replace the thermostatic cartridge. |
| The mixed water runs, but at insufficient volume. |
|
| By installation of a new thermostatic mixing valve: only hot or cold water runs. | The hot and cold water inlets are reversed. Install reverse (inverse) model of thermostatic cartridge. |
| The mixed water temperature follows the position of the knob but with some discrepancy. |
Re-calibrate the thermostatic cartridge. |
| The mixed water does not come out of the thermostatic mixing valve or only in an extreme knob position. | The water supply is insufficient. |
| The mixed water runs by jerks and the flow is low, except for extreme temperatures. |
|
Lifespan of Thermostatic Cartridge
The lifespan of the thermostatic cartridge can be 10 to 20 years, depending on water quality and other factors. It typically lasts up to about 15 years.
The longevity of a thermostatic cartridge can be influenced by several factors:
-
Water Quality
- Hard Water: High levels of minerals like calcium and magnesium can lead to scale buildup inside the cartridge, which can impair its function over time.
- Chlorine and Other Chemicals: These can corrode the materials of the cartridge, especially if they are not resistant to such chemicals.
-
Frequency of Use
Cartridges in frequently used showers or faucets will wear out faster due to the continuous mechanical action of temperature changes and water flow.
-
Temperature Fluctuations
Extreme hot to cold water changes can stress the internal components, particularly if the cartridge is not designed for such wide temperature swings.
-
Installation Quality
If the cartridge is not installed correctly, it might not function optimally, leading to premature wear. This includes ensuring the right size and type of cartridge is used for the specific fixture.
-
Maintenance
Lack of maintenance can significantly reduce the lifespan of a thermostatic cartridge. Regular cleaning to remove sediment, scale, or debris can extend its life.
-
Material Quality
Higher quality materials can last longer than less durable alternatives. The quality of the rubber seals and O-rings also plays a role in longevity.
-
Sediment and Debris
Particles in the water supply can cause wear on moving parts or block passageways, leading to malfunction or reduced performance.
-
Environmental Factors
Exposure to harsh chemicals, extreme temperatures, or even the climate in which the plumbing system operates can influence how long a thermostatic cartridge lasts.
To maximize the lifespan of a thermostatic cartridge, one should consider installing a water softener if hard water is an issue, regularly check and clean the cartridge or at least the screen filters, and ensure that the water temperature does not exceed the manufacturerʼs recommendations. If performance starts to degrade, it might be time to either clean or replace the cartridge, depending on its condition.